Printable Stationery
A Paint Shop Pro Tutorial by Janie
This is my First attempt at writing a tutorial :-) I hope you will enjoy it! Terms of use are listed at the bottom of this page.
This tutorial was inspired by an Email Stationery tutorial by KathZil which I enjoyed doing very much. Please check it out yourself!!
You can find it Here
I used Paint Shop Pro X, which you can get Here.
I Used Eye Candy 3.1 which you can get Here.
Entrelacement plugin which you can get Here. Unzip it to your plugins folder. You will find it listed as Jeux de lignes/Entrelacement in PSP.
The supplies I used are Here. Unzip the Tube to your Tubes folder, and Mask to your Mask folder.
OK, Let's get started!!
1.) Open the SILVER_CHRISTMAS_TREE_01_MM-1 tube in your workspace, or choose a tube you wish to use. Remember, this will be printed on a full sheet of paper, so your tube will need to be on the large size. Also open the fan mask supplied or one of your choice.
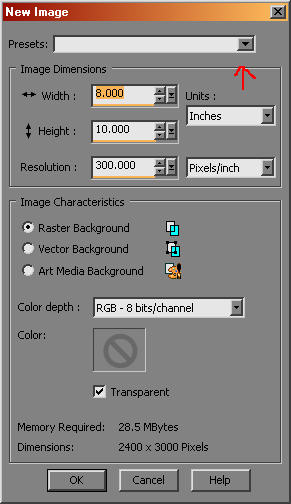
2.) File>New. Click on the dropdown window at Presets and choose 8 x 10 in Vertical. Raster background and Transparent checked. Click OK.
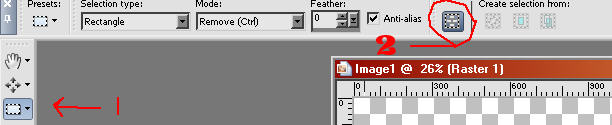
3.) Now, choose your Selection tool, and then click on the Custom Selection icon (#2 in the example).
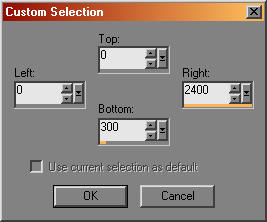
4.) Set the Top at 0, Right at 2400, Bottom at 300, and Left at 0. Click OK.
5.) Flood fill this selection with your border color. Deselect.
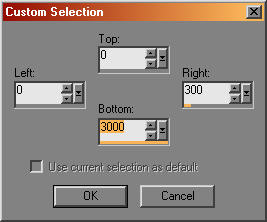
6.) Click on your Custom Selection icon again. This time make your settings: Top 0, Right 300, Bottom 3000, and Left 0. Floodfill this selection with your border color. Deselect.
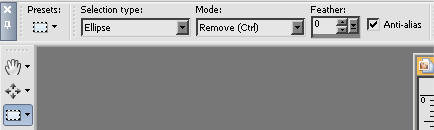
7.) Now, in the drop down box for Selection Type, choose Ellipse, Feather 0 and Anti-Alias checked.
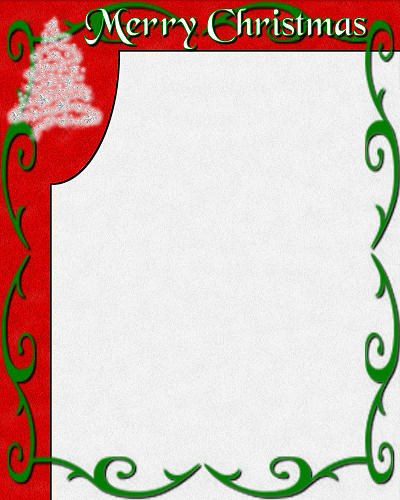
8.) Beginning at the inside corner of your border, draw your ellipse down and out until the bottom is around 1100 and to the right about 700. Flood fill this selection with your border color. Now you should have something like this. The background is transparent, so you are seeing "through" the stationery.
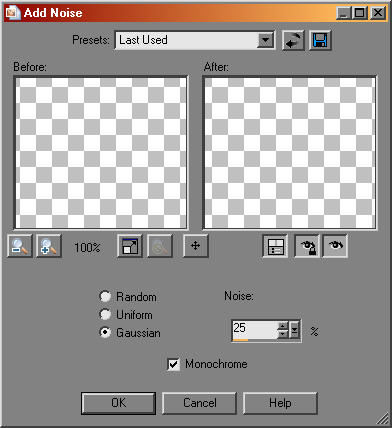
9.) Now, with your Magic Wand, Tolerance and Feather at 0, Anti-Alias checked, click on your colored border. Adjust>Add/Remove Noise>Add Noise, Gaussian, 25 % and Monochrome.
10.) Next, Eye Candy>Fur, with these settings: Wave Spacing 123, Waviness 10, Hair Length 25, and Shininess 22.
11.) Let's add a Drop Shadow now. Effects>3d>Drop Shadow with these settings: Vertical and Horizontal at 10, Opacity 100, Blur 5.0.
Deselect.
Page 2

My Terms of Use for this tutorial are as follows: You may send the link to this tutorial, but Not the tutorial itself, to whomever you think will have fun with it. Groups are welcome to use the tutorial, but I would like to know first :-) Please drop me a note of request Here before posting in a group setting.
I do not know the artist of this beautiful Christmas Tree image, or the person who tubed it. I would love to give credit to them and would appreciate you dropping me an Email if you know.
This page and tutorial are copyright to Janie Shipman, June 2006.
This site is best viewed at 1280x1024 in Internet Explorer 6+.