Summer Wind Frame

1. Open up
your graphic in PSP8 and make a duplicate.
Minimize the original.
Choose two contrasting colours from your graphic for your Materials
Palette.
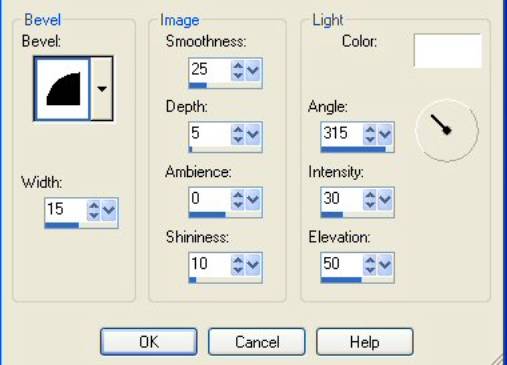
2. Add a 4
px border and flood fill with the darker of your selected colours. Go to Effects > 3D Effects > Inner
Bevel with the following values:
3. Go to Selections > Invert. Then go to Effects > Plugins > Eye Candy 4000 > Cutout. Deselect.
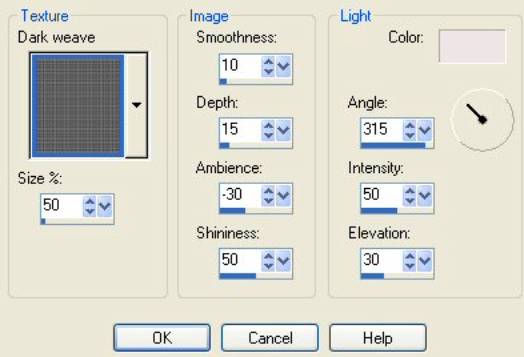
4. Add
another 4 px border and flood fill with the lighter colour. While still selected, to go Effects >
Texture Effects > Texture with the following settings. Make sure the colour in the box is the
same as the flood filled border.
While still selected, go to Adjust > Sharpen > Sharpen once. Deselect.
5. Add
another 4 px border and flood fill with the same darker colour as the first
border. Effects > 3D Effects
> Inner Bevel with the same settings as for the first border. Deselect.
6. Add
another 30 px border. Click inside
the border with your Magic Wand, and flood fill a pattern of your choice. In this frame I selected the flowers,
copied and pasted as a new image, then made a seamless tile for my pattern
fill. DO NOT
DESELECT.
7. Add
another Raster Layer. Flood Fill
with the lighter colour. Go to
Layers > Load/Save Mask > Load Mask from Disk. I used SN Frame.10 >
Load.
8. On the
Layers Palette right click on Mask and click Delete. You will get the following popup. Click YES.

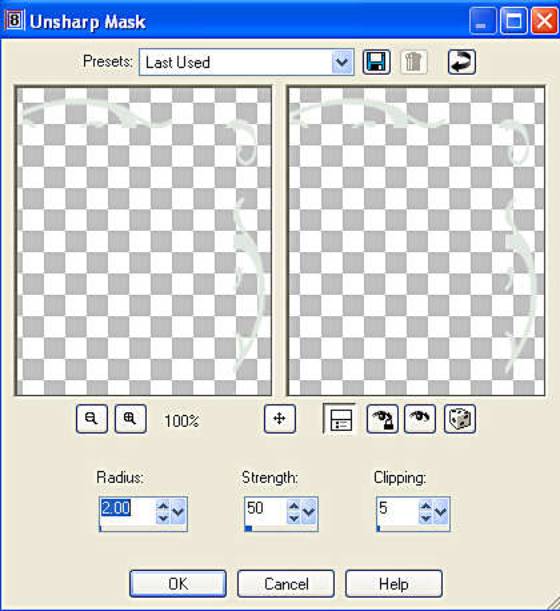
9. While still selected click on Adjust > Sharpness > Unsharp Mask as shown below. Then Adjust > Add/Remove Noise > Add Noise with the following settings. (Some colours or shades, especially the lighter ones, could use more noise; so adjust to your taste. I went to 40% on very light colours.) DO NOT DESELECT.

While still selected, apply the same Inner Bevel to your mask to give it some dimension.
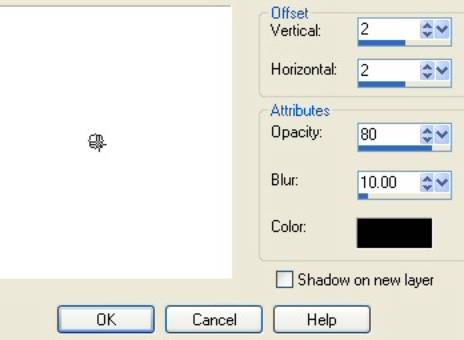
10. Selections > Float. Effects > 3D Effects > Drop Shadow with the following settings. DESELECT
11. Layers > Merge All (Flatten).
12. Repeat Steps 2 – 3 – 4 and 5; and you’re all done.
I hope you had as much fun with this frame tut as I did! ;-)
Hugs
Natalie
Seilatan Designs©