For this tutorial you will need a graphic.
Unzip VM Natural to your plugins folder before opening PSP.
Open your chosen graphic in PSP. Shift+D to duplicate, then close the original.
Pick a light color from your graphic for the Foreground, and a darker color for your Background.
Image-Add borders-2px, symetrical, your Background color.
Image-Add borders-2px Foreground color.
Image-Add borders-2px Background color.
Image-Add borders-20px Foreground color.
Image-Add borders-2px Background color.
Image-Add borders-2px Foreground color.
Image-Add borders-2px Background color.
Add your text.
I used the font Bell Bottom (in the zip), with the Background color set to Null and a Stroke of 2.
That gave me a nice open area you could see through.
Then I gave the text a White Drop Shadow with V&H at 0, opacity at 100 and blur about 5.
If you now have more than one layer, Layers-Merge-Merge All.
Choose your Lasso tool (in the flyout with the Magic wand), with these settings.
click around the area you want to add sparkles to
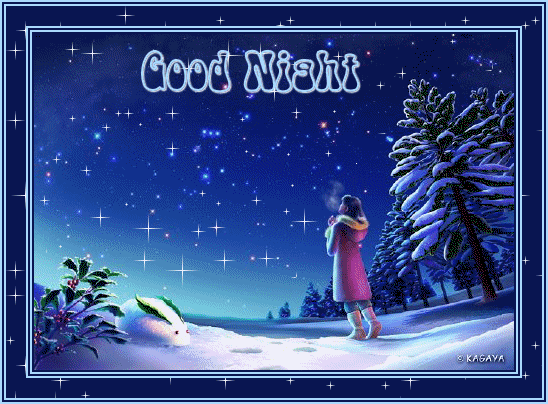
In the example above I surrounded the sky, in the one below, the snow covered tree.
Effects-Plugins-VM Natural-Sparkles.
Let me tell you about the settings so you can set them as you desire :-)
First the size, just that. For the borders I found a size around 50 good, for the tree around 25, and the sky around 50.
The color sliders will change the color of the sparkles, so you could have each layer a different color.
The RND color off/on randomly changes the colors.
The random seed changes the stars around.
Now that you know what the settings do, choose something that looks good in the example shown in the window and click ok.
If you don't like it, Edit-Undo and change the settings a bit.
When you are happy with the sparkles in the selected part, Select-None.
With your magic wand, click in the 20px border.
Effects-Plugins-VM Natural-Sparkles.
Change or don't change the settings :-)
Selections-None.
Edit-Copy your 1 layer image.
Edit-Paste as a New Image.
OK, now you have 2 identical copies of the same thing, 1 layer each.
The original which I will now call the Working copy.
And the second which will be the base for the animation which I will call New Image.
Back on your Working copy, Edit-Undo until you are back to your Point to Point selection, that should be about 4 or 5 Edit-Undo's.
Again, go to Effects-Plugins and apply the Sparkles changing the settings a bit so they move. Change the size by 5 or so, and the Random seed by a few too.
Do you know that at the very bottom of your Effects is Last Used Plugin? Now each time you can just click on that to take you straight there!!
Once you have your selection sparkled again, Selections-None.
Magic Wand select the 20 px border, and add sparkles. Selections-None.
Edit-Copy. Go to your New Image and Edit-Paste as a New Layer.
Back again to your Working Copy, Edit-Undo once again to your Point to Point Selection.
A last time, add Sparkles, changing the settings a bit again in your selection and then in the 20px border.
Edit-Copy. Edit Paste as a New Layer on your New Image.
Now your New Image has 3 layers.
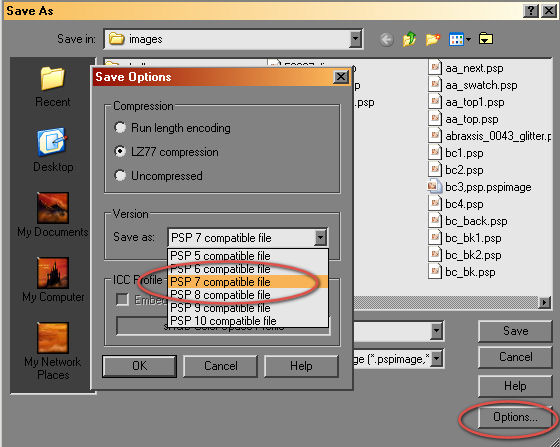
On your New Image, File-Save As, and save as a .psp file in a folder you can find it in.
Be sure when you save it that it is PSP7 compatible because Animation Shop has not been upgraded since then.
Open Animation Shop.
Click on the Wizard icon just under File in AS.
Click on Same Size and OK.
Tick Opaque with Black as the color and Next.
Tick Upper left, and then With the canvas and Next.
Tick Yes, repeat the animation, set the frame speed to 20, and Next.
Click on Add Image and locate the .psp file you saved, highlight it and then click on Next.
Click on Finish in the next window and you will then see your psp file.
View-Animation and you will see the action.
File-Save As. Give your animation a name, and save as a gif.
You will probably see some other windows pop up asking you the quality of the gif......I can't show you those because at some point there is a box that asks "always use these settings" and I ticked it.....do NOT check that box!!
There seems to be no way to reverse that. I need to uninstall and re-install Animation Shop......when I find the time...... :-)
One thing I can tell you is the better the quality, the larger the file size.
In some cases it's not a big deal, and others it is.
You're Done!!
I hope you had fun with it :-)