For this tutorial you will need a graphic.
No outside filters were used.
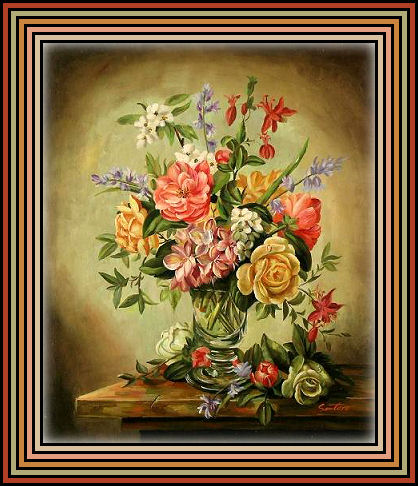
I will call this one Beginners.
Open the graphic you wish to use, Shift+D to duplicate it, then close the original.
The first thing we are going to do is create a color swatch.
A color swatch is a handy thing to use if you are going to be using several colors.
Even though PSP holds recent colors, this is faster :-)
Open a New Image, 200px by 50px, with a white background, or floodfill it with white.
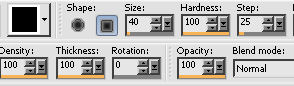
Choose your Paint Brush with these settings.
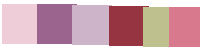
With your Foregound, choose a light color from your graphic, then Paint it on the left of your swatch.
Repeat this 5-6 times with your Foreground color, choosing a different shade, Painting a sample of it just to the right of the last color until you have something like this.
There's no need to be careful Painting, and no need to save the swatch at the end of working the tut, it just speeds up the tut work :-)
Now to begin the tut!
Choose the lightest shade for your Foreground color, and set your Background to the Gold pattern.
Activate your graphic.
Image-Add Borders, 3px symetrical, Black.
Image-Add Borders, 5px your light Foreground color.
Image-Add Borders, 3px Black.
Image-Add borders, 5px another shade from your swatch. You can choose the colors from the swatch from the Add Borders window by clicking on the color box there:-)
Repeat the 3 px Black border, 5px new shade border, 3px black border, 5px new shade border, 3px Black border, 5px new shade border and finally 3px Black border.
You should now have 6 black borders and 5 color borders.
With your Zoom tool, change the Zoom to 200%.
That will make the image easy to work with.
Now, with your Magic Wand at these settings, hold the shift key down and choose all the black borders.
Floodfill the black borders with the gold pattern.
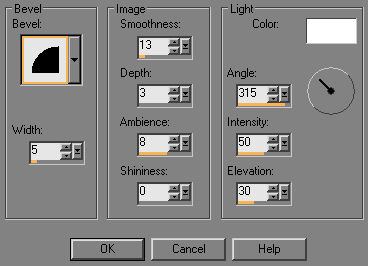
While still selected, Effect-3d-Inner Bevel with these settings.
Selections-None.
Selections-Select All.
Selections-Modify-Contract by 43 px.
Selections-Invert.
You should now have the entire frame selected.
Edit-Copy. Edit-Paste as a New Image.
On your New Frame image, choose your Selection tool, then choose the Custom Selection.
That will bring up a new window.
Settings as below.
Now you have the upper left corner selected. Edit-Copy. Edit-Paste as a New Image.
On your new little corner image, Image-Mirror, and then Image-Flip.
Your corner should now be pointing the opposite way. Edit-Copy.
Activate the frame image that is transparent in the center. Selections-None.
Edit-Paste-As a New Layer.
With your Mover Tool, move it to the upper left corner, down and to the right just enough so the final gold border shows.
**Tip Time!
Once you have moved something or even just clicked on it with the mover tool, you can use the up/down/right/left arrows on the keyboard to move it into near perfect position!!
Layers-Duplicate. Image-Mirror. Layers-Duplicate, Image-Flip. Layers-Duplicate, Image-Mirror.
Now you should have the new corner in all 4 corners.
In the layer palette, x out the eye on the frame layer, and Layers-Merge Visible.
Open the eye on the frame, highlight the 4 corners layer and add a drop shadow, use V & H at 0, opacity 100 and Blur 30. color black.
Highlight the Frame layer and with your Magic Wand, select the center.
Effects-3d-Cutout, V & H at 0, Opacity 100, Blur 20, color black.
Layers-Merge Visible.
Edit-Copy.
Activate your framed graphic image. Selections-None.
Edit-Paste as a New Layer.
Layers-Merge All.
I added gold text, used the same Inner Bevel as the gold parts of the frame, and Drop Shadow as on the 4 corners.
File-Export-JPEG Optimizer with these settings.
And you're done!!
I hope you had fun with it :-)