For this tutorial you will need a graphic.
No outside filters were used.
This is a Beginners Tutorial.
If you are not into making stationery, the tag will stand alone by itself :-)
First we have to make the parts to use for either or both.
Open your chosen graphic in PSP. Shift+D to duplicate. Close the original.
Choose a light color from the graphic for the Foreground color, and a dark color for the Background.
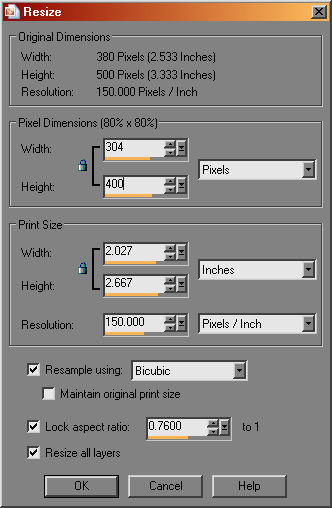
We need to start by making our graphic no taller than 400px.
Activate your graphic.
Image-Resize with these settings.
Your height does not have to be 400, but it does need to be divided evenly by 2 later, so don't make it 399 or another odd number :-)
Adjust-Sharpen-Sharpen if your graphic is fuzzy from the resizing.
Choose your Selection Tool with these settings.
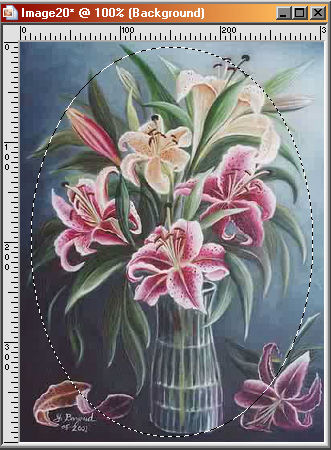
Now put your cursor about in the middle of your graphic, don't click yet.
Look to the bottom right of your screen to the numbers, here's what mine looks like for this graphic.
The first numbers, x152 and y200 on mine is where my cursor is.
Where it says Image:304x400 is the size of the graphic.
I have my cursor exactly at the center of the graphic.
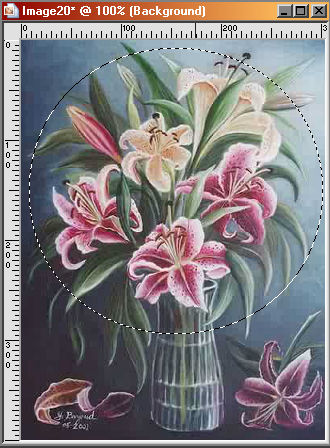
Before you start your selection, be aware with the Feather Selection, at 25, that your final selection will expand by that much when you let it go.
What happens is that the 25 pixel feather takes the solid graphic and fades the edge out to transparent over that 25 pixels.
If the selection you made expands too far and you get straight edges, Edit-Undo and try again :-)
Your selection should look something like this, nice round edges :-)
A note here, you can choose the selection as you wish, and any part of the graphic you wish.
As in the example below, I choose only the flowers rather than the whole main graphic.
Once you have the selection you want, Edit-Copy. Edit-Paste as a New Image.
Now you can see the feathered edge :-)
Shift+D to duplicate it.
On one of the copies, Effects-Image Effects-Seamless Tiling at the Default settings.
If the tile still has transparent areas, Layers-New Raster Layer.
Layers-Arrange-Send to Bottom.
Flood fill that layer with your lighter Foreground color.
Layers-Merge All.
Image-Resize, same settings as before, Except make the Height 200, or Half the size of your graphic's Height.
Shift+D to duplicate your new pattern.
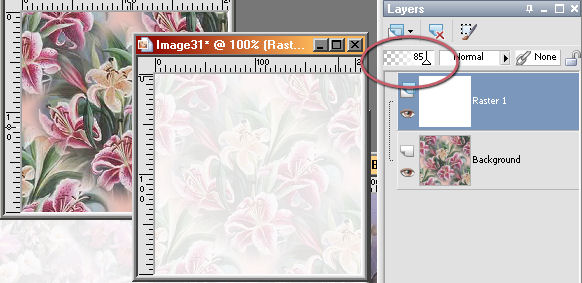
On the New Image, Layers-New Raster layer.
Flood fill this layer with white.
Lower the opacity of this layer to about 85%.
You can see here, both the original tile, and the one with the white layer and where to adjust the opacity.
You can see how the white layer softens the background tile.
OK, now we have everything we need to make either the stationery strip, or tag, or both :-)
****
We'll start with the stationery, if you don't wish to do this part, scroll down to where you see **** again and that will begin the tag.
For the stationery strip, File-New. Make the width at least 1280px, with the wide screens out there now, this is about as small as you can go and not begin to repeat.....Height 400.
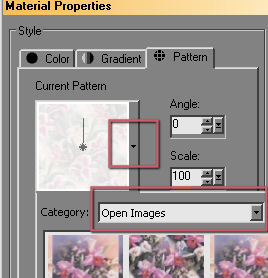
In your Foreground color box, click and choose Pattern.
Click on the little arrow next to the Current Pattern, and then in the drop down box at Category choose Open Images.
In the pattern options, have the Angle at 0 and Scale at 100.
From there, click on the soft background you made.
Flood fill the canvas with the soft background.
If your strip is 400 in height, and your background seamless tile is 200 in height, this strip should be seamless as well, but if you have doubts, Effects-Image Effects-Seamless tiling at Default.
That will blur the background a bit, but shouldn't hurt the overall stat :-)
Now, activate your original misted image, the one that fades the edges.
Edit-Copy.
Activate the long strip.
Edit-Paste.
With the Mover tool, move the misted image to the far left of the strip, keeping it centered vertically.
When you have something like this, you are done :-)
File-Export-JPEG optomizer with these settings.
****
Now, we're going to work on the tag :-)
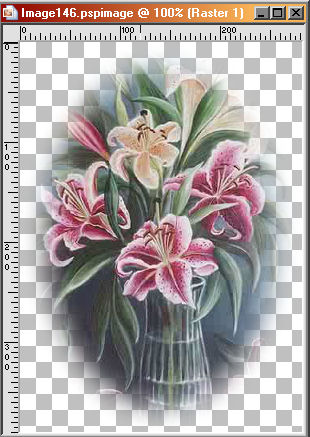
Activate your misted transparent image.
It's going to be the one that looks something like this.
Layers-New Raster Layer.
Layers-Arrange-Send to Bottom.
Change your Foreground to Pattern and choose your "softened" background.
Change your Background to the original background pattern (without the white layer).
Floodfill this layer with your "softened" background pattern.
Layers-Merge All.
Selections-Float.
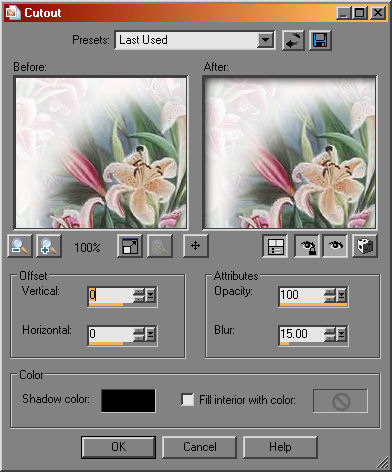
Effects-3d-Cutout with these settings.
Selections-Defloat.
Selections-None.
Image-Add Borders, 10 px symetrical, a color Not in your image.
With your Magic Wand, select this border.
Flood Fill it with the Background pattern.
!!Tip, on most tools, left click will use the Foregound and Right click will use the Background. With your Foreground set to the Soft background and your Background set to the full color background, Left click will Flood fill the area with the soft background, and Right click the full color :-)
While still selected, Effects-3d-Inner Bevel with these settings.
This is what you should have now.
We're almost done :-)
Selections-None.
Image-Add Borders, a color Not in your image, 30 px symetrical.
With your Magic Wand, select this border.
Flood fill it with your Foreground, the softened pattern.
Selections-Float.
Effects-3d-Cutout with the last settings.
Selections-Defloat.
Selections-None.
Image-Add Borders, 10px symetrical, a color not in your image.
Select this border with your Magic Wand, and Flood fill it with your Background pattern.
Effects-3d-Inner Bevel with the last settings.
Selections-None.
Add text as you wish, and File-Export-JPEG optomizer as shown in the stationery strip.
You are Done :-)
I hope you enjoyed it :-)